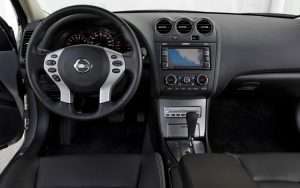
2008 Nissan Altima Stereo Upgrade (07-2013 Coupe & Sedan)
A 2008 Nissan Altima stereo Upgrade (works for 2007-2013) is a pretty easy job once you understand how to disassemble and reassemble your stereo trim.

Amazon affiliate here: If you click any Amazon links on my pages and purchase any products I get a small commission from within the original price. Thank you!
You’ll need to find the parts necessary properly preform the install as well. There are a few different companies that make the installation parts you’ll need, the difference between them has more to do with how your new stereo will look after it is installed.
Table of Contents
Keep in mind that the installation procedure applies to Nissan Altima’s from 2007-2013. If you have Bose the only difference will be the radio harness youll use during the installation, otherwise the installation procedure is exactly the same.
2008 Nissan Altima Without Bose


A 2008 Nissan Altima Stereo upgrade on a non-Bose system is almost exactly the same. The difference (as stated above) is the radio wiring harness you will need to buy in order to adapt your new aftermarket radio to your to your factory wiring system.
Your Non-Bose system can be identified by the lack of a “BOSE” logo on your the top left side of your stereo however; Having a non Bose system honestly doesn’t mean you are limited.
Look at it this way, If your sound goes out or if you have so much as a crackle in your speaker while playing your music it will take longer for in installer to sniff out the problem.
Time equals money. So, when a Bose system goes out it tends to be at least twice as expensive as a non Bose system would be to fix.
2008 Nissan Altima Bose Stereo


Nissan used a premium audio system option on their vehicle for a number of years, this was the case for 2007-13 Altima’s as well. Essentially, Nissan used Bose built equipment in order to provide an enhanced listening experience.
They did this by adding an amplifier and subwoofers to the vehicle, but you can still upgrade the stereo system. You’ll just use a different wiring harness, its actually a bit easier.
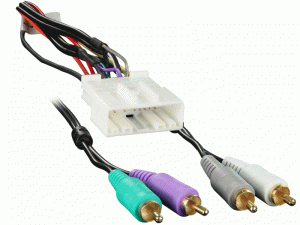
Your new wiring harness needed for installation with the Bose system will have RCA speaker leads on it. This means that youll need a stereo with at least 2 sets of RCA out-put’s.
If you intend on installing a separate subwoofer amplifier you will need two more sets of RCA out-put’s for a total of 3 sets.
Helpful Resources
- How to install a car stereo
- How to install a car audio amplifier
- How to bypass a factory amplifier
- A collection of our favorite car stereo’s
2008 Nissan Altima Stereo Upgrade – How do I Remove My Old Radio?
Installing an aftermarket stereo into 2007-2013 is pretty strait forward and i’m not just saying this because I’m a certified Installer.
Its an excellent beginner level stereo installation for anybody looking to get started as a car audio technician or DIY.
We came up with a list of steps for you to follow, I actually found a pretty cool video for you to take a look at below if you’d rather see it done than read our steps.
- Remove the air vents above the radio. This should be done with a plastic or nylon pry tool or panel removal tool. Start by wedging your tool in between the air vent assembly and the dash board to loosen the air vent trim. Once it is lose and able to pull out make sure you pull it strait out.
- Remove the air vents above the radio. This should be done with a plastic or nylon pry tool or panel removal tool. Start by wedging your tool in between the air vent assembly and the dash board to loosen the air vent trim. Once it is lose and able to pull out make sure you pull it strait out.
- Remove the air vents above the radio. This should be done with a plastic or nylon pry tool or panel removal tool. Start by wedging your tool in between the air vent assembly and the dash board to loosen the air vent trim. Once it is lose and able to pull out make sure you pull it strait out.
- Remove the air vents above the radio. This should be done with a plastic or nylon pry tool or panel removal tool. Start by wedging your tool in between the air vent assembly and the dash board to loosen the air vent trim. Once it is lose and able to pull out make sure you pull it strait out.
- Remove the air vents above the radio. This should be done with a plastic or nylon pry tool or panel removal tool. Start by wedging your tool in between the air vent assembly and the dash board to loosen the air vent trim. Once it is lose and able to pull out make sure you pull it strait out.
2008 Nissan Altima Stereo Upgrade – The Best Stereo for A 2008 Nissan Altima
When you have the factory Bose system that works and you would like to keep it you want to make sure you purchase a radio that will accommodate that feature.
Your Bose system uses Low level input for the factory amplifier, this allows the Bose amplifier to re-create the sound from your radio with minimal distortion. But here’s the kicker, your new stereo will have way better sound for your Bose amp to use.
I looked at a couple of different stereos I use for these vehicles and narrowed them down to two different stereos. A double din style radio and a single din style radio:
Recommended Double Din Style Radio For Your Nissan Altima (07-2013)
This is the Pioneer NEX 4100 Double Din Stereo
We wrote a review on this stereo a while ago where we went pretty in-depth on its features and different sound customization options.
With this stereo you will be able to get a decent quality boost in sound, not to mention you can expand on streaming options, media input and media playback options.
This is one of the top selling double din stereos in its class and a favorite among car audio installers all over the world. The options are endless with this thing, to name a few:
- Bluetooth Hands free calling – Allows you to make and receive calls directly from this unit with a loaded phone book that is imported from your phone.
- Back-up Camera capable – Allows you to utilize an aftermarket backup camera (purchased Separately). You can also use your factory backup camera if you have the proper factory harness pin out diagram and video wires.
- extensive EQ options – The EQ on this thing is amazing and can be fully customized with or without A Bose system.
- Pandora on board – Once you launch the Pandora App on your IPhone or supported Android device you can set it aside and let the Pioneer take over.
- HD Radio – Listen to your AM and FM at CD like quality, you may also enjoy certain stations you could not previously pickup with your factory Nissan Radio.
- Sirius Radio – When you purchase the aftermarket Sirius Radio add-on kit for this radio you can then receive sat radio and use it directly through the Pioneer 4100nex.
Parts Needed to Install a Double Din Radio Into your 2007-13 Nissan Altima
This will be the differentiating factor in your install. The parts necessary for your install vary by whether or not you have The factory Bose system and by the size of the radio you are looking to install. No problem, we created a list of what youll need in each situation:
2008 Nissan Altima Radio Dash Kit
(Comes with both single and Double din Kits in package)
The Metra 99-7423 dash kit works for 07-2013 Altima sedan’s and coups with and without Bose. It comes with all of the instructions youll need to complete this installation from beginning to end.
In fact, these are the very instructions that we use when we have any questions or cannot seem to remember a particular step.
Remember, this kit comes with the single din radio fitment kit and the dual din radio fitment kit. This is what we like to call a “one and done” kit.
Wiring Harness – (For Factory Bose systems)
This wiring harness was created to integrate your new radio to your existing factory Bose amplified system.
The difference between the Bose and the Non Bose Harness is the RCA end’s, they were placed on this harness to provide what is called a ‘Lo Level’ signal.
Your Bose requires this specific type of signal in order to create the better quality sound you’ve been experiencing.
While the Bose amp does recreate the sound it will not degrade the quality that your new stereo will produce. Your actually providing better signal quality for your amp to utilize, youll notice a pretty nice jump in sound quality for sure.
Wiring Harness – (For Systems without Bose)
This harness is made to pass what is called ‘Hi Level’ signal from your radio directly to your speakers.
Since there aren’t any amplifiers in the non-Bose Altima’s you wont need to integrate with anything specific, you will just connect this harness wire to wire from this harness to the harness that comes with your new stereo in-box.
While this harness is intended for Non-Bose systems it can be used if you have removed the Bose system and all of its components such as speakers and the factory installed subwoofers.


When wiring this harness up take a couple of seconds to plug it in to the factory radio plug and follow the black wire from this harness over the clip to the factory harness to see if there is a wire on the other side. This is the ground wire.
If the ground wire isn’t present on the factory side then I recommend grounding the black wire on the harness that came in the box with your new radio to the metal bar directly behind the radio.
Antenna Adapter – (For Systems with and without Bose)
An antenna adapter is used to intercept the radio frequencies from your factory antenna and deliver them to your new aftermarket stereo.
This part is important in your Nissan Altima Stereo upgrade if you would like to retain your AM/FM signal.
This antenna adapter plugs into your factory antenna plug that you unplugged from your factory radio and provides what is called a ‘Motorola’ style connector that will plug into your new radio.


You’ll notice in the picture that there is a wire attached to the antenna adapter, this wire is intended to provide your Altima’s antenna the power it will need to receive high quality radio signal.
This blue wire is to be attached to your aftermarket stereo harness. More specifically you will be attaching it to the solid blue wire on your aftermarket wire harness.
What this will do is send 12 volts from your radio to your factory antenna, but only when the radio is turned on to the AM or FM position.


