You simply cannot be considered a car audio enthusiast or installer if you have not yet heard of this self powered subwoofer system. Especially, the Kicker Hideaway.
Kicker was the first company to actually build a system like this the right way, so we created the Kicker Hideaway Review to bring more awareness to the car audio geek world.

Amazon affiliate here: If you click any Amazon links on my pages and purchase any products I get a small commission from within the original price. Thank you!
Kicker Hideaway Specs:
- 150 Watts RMS @14.4 volts
- Frequency response 25-150Hz Bass Boost 6+db @ 40Hz
- Internal Hi/Low Converter
- Box Width: 9 3/8 inches, 23.8 Cm
- Box Height: 3 1/8 inches, 7.94 cm
- Box Depth: 13 7/8, 35.2 cm
Right out of the box the kicker 11HS8 subwoofer gives you all the wires and wire terminals you need to properly ground and connect to the battery for your source of power.
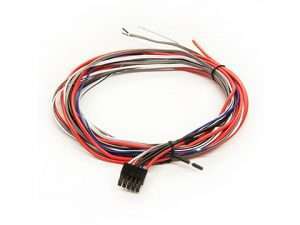
The cool thing about the wiring is that kicker supplied a harness that plugs strait into this amplifier and has elongated wiring for power, ground, remote and signal.
Need Help Installing any Audio Equipment?
How To Install A Car Amplifier
Find Your Audio System's Ideal Wire Gauge
Looking For a New Audio System Build?
Answers To Some Common Questions
How to Choose the Right Power and Ground Wire
Matching Subwoofers and Amplifiers
Get More Bass Out Of My Subwoofer
Why Does My Stereo Cut Out at High Volume?
As if that doesn’t make it easy enough, Kicker has also supplied a built in Hi/Low converter so that you are able to use those signal wires for high level input behind a factory radio at the harness or you have the option to solder on RCA’s and plug directly onto your aftermarket radio.
The only issue i ran into while wiring The Kicker 11HS8 was that the stereo didn’t have powerful enough pre outs to turn on the amplifier, so i ended up having to run a dedicated remote turn on wire from behind the aftermarket deck. Mounting is also as easy as it gets with the kicker 11HS8 hideaway, it comes with all the necessary screws and mounting brackets for slick and clean mounting capabilities.


Kicker Hideaway Install
The are a few main things that are important to think about in a Kicker Hideaway install. The first thing is your harness (included with Kicker Hideaway).
Make sure your wires will reach far enough to connect to your vehicle’s power, ground, and speaker wires.
Mount Your Kicker Hideaway Properly
Another thing you want to consider is how well you are able to mount this unit. Try to mount the Kicker hideaway somewhere the amplifier can breathe, it will definitely get hot if is not in a properly ventilated location.
Kicker Hideaway Wiring
The fellas down at Kicker made this part pretty easy. So ill make this part pretty strait forward and easy to understand.


Connecting The Signal Wires
- The first step is to connect the grey and white speaker wires. your Grey wire from the kicker harness is the right side positive high-level input. Connect this to your vehicle’s front right or rear right positive speaker wire. Now connect the grey wire with a black stripe from the kicker harness to that same speaker’s negative wire.
- Now, move over to the left side of the vehicle and repeat. But this time you’ll use the white and white with black stripe wires. Remember, the wire with a black stripe on the kicker harness should go to the negative input of that speaker wire.
Connecting The Power Wires
- Connect the red wire on the kicker Hideaway harness to a 12-volt constant source. This is a source that has constant power from the battery. The ideal connection is always at the battery.
- Now, connect the black wire (ground wire) to a clean metal chassis area. Make sure this area is as close to the amp as possible, clean and free of debris. Make sure to scrape away any paint from the contact point of the wire and the metal. Before mounting please make sure this is a safe area for pets and children, so it won’t get touched or disconnected.
- Hopefully, you have found a location to connect the amp turn-on wire on the kicker harness. (blue wire). This wire needs a 12v source that should be live only when the vehicle is on. This can generally be a cigarette light circuit or if absolutely necessary your factory ignition harness behind your key cylinder.
The third and final thing to remember, This is very important. Make sure that you click the Amp turn-on switch to the correct position that best corresponds with the manner in which you installed the kicker Hideaway. Ill explain.
The Kicker hideaway has the ability to turn itself on in 2 different ways. It can either sense the signal from your speaker wires or it can wait until there are 12 volts present on the blue amp turn-on wire (On the Kicker main harness). However, youll need to indicate that for the amplifier.


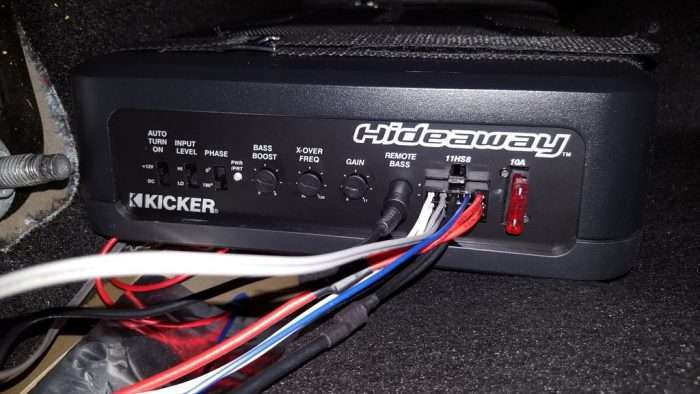
The switch is labeled on your Hideaway. It will say “Auto Turn on”. Under that will be a switch that will say “+12v and DC”. If you connected your blue “amp turn on” wire to another wire that you would like to use in order to turn your Hideaway on make sure you put the switch into the “+12v” position. If you did not install your blue “amp turn on” wire onto any other circuit in your car then make sure you put the switch into the “DC” position, so that your Kicker Hideaway will actually turn on.
Double Check Your Input Level Setting
After you set your Amps turn on settings properly, double check and make sure your input level settings are properly adjusted. If you have your wires hooked up from a low level signal (signal often used to go into a factory or aftermarket amp) you will need to make sure that switch is in the position labeled “Lo”.
If your signal wires are hooked up to a high level signal (Signal at full level not typically used to input into amplifiers) make sure you switch it to the “HI” position. If your not sure what position you should put it in think about this. Did you solder on RCA cables? Did you connect a High Low converter? If you answered no to both of these questions you are more than likely in this situation running a Hi level set up.
Click Here To Check Out The Kicker Hideaways Current Prices
Tuning the Kicker 11HS8 Hideaway
I feel like I might be getting a bit too in depth… But.. We are audio geeks none the less. So lets talk Tuning the Kicker Hideaway. Before starting make sure your bass level (if you have one) on your radio is set to its most centered position. (only half way up).


- After you’ve set all of your input settings properly a good thing to do when tuning any amplifier is to turn your ‘gain’ settings down to the very lowest possible.
- Turn your bass boost all the way down. This is generally not even a necessary option as it just adds digital distortion on most amps.
- Turn your ‘X-Over Frequency’ all the way to the right (the highest freq).
- If you’ve already installed your bass knob controller turn that down all the way as well.
- Make sure your amplifiers gain is all the way Down. This is so that your bass knob will take over. If the gain at your amp is set to max then your bass knob will not work. It is important to note that you need to turn the wired bass knob all the way down after your amplifiers bass is is turned Down. You’ll be able to adjust this to your liking later.
Kicker Hideaway Settings (Frequency Response)
- Now that your frequency response has been set all the way to the right (to the highest frequency), you can now turn on your car and turn your stereo volume 3/4 of the way up. For example if your radio goes up to 40 then crank it up to about 30. This simulates an above average listening volume and helps to make sure you don’t blow your Kicker Hideaway system.
- Start by turning your frequency knob on the Hideaway system to the left until you hit the middle of the circle pointing up.
- Now turn your wired bass knob about half way up. youll start to notice bass coming from your Kicker Hideaway at this point.
- Use your ears and listen to how much bass is present coming from your Kicker now. Continue turning your frequency knob labeled “X-Over Freq” to the left until you love what you hear!
- Do some A and B testing to make sure that your “Phase” is set for the best sound by flicking it up and down and listening to the sound difference.
Now your able to turn your wired bass knob to your desired position for your wanted sound level.
Kicker Hideaway Trouble Shooting
Amplifiers and subwoofers are not immune to problems. The cool thing is they are generally due to installation error. This means that trouble shooting your kicker Hideaway should be pretty simple!
Kicker Hideaway Does Not Turn On
If your Kicker isn’t turning on (LED light is off), then simply turn your vehicle off and replace the fuse at the amplifier. If you are handy with a multi meter then remove the harness plug from the amplifier and test the power wires for 12 volt. If you are not getting 12v from the red wires then test your fuse. If your fuse is good then your connection to the battery is the issue.
If you have 12v from the battery present on the plug that connects to the Kicker Hideaway then your issue maybe the amp turn on wire (blue wire). Did you use that wire as an amp turn on option? If so did you let the Kicker system know? Take a look at the switch labeled “Auto Turn on”. make sure the amp turn on switch is set to 12v+.
Kicker Hideaway Turns On But No Sound
If your amps light is on and you have no sound that is generally a phase issue. Check your speaker wire connections where the kicker grey and white wire pairs connect to your factory speaker wires connect.
Make sure you have the proper polarity. if you have your negative and positive speaker wires hooked up backwards your Kicker Hideaway will go into protect mode and you wont get any sound at all.
Our Experience Installing The Kicker Hideaway


I had the pleasure of installing A Kicker 11HS8 Hideaway in a 98 GMC Jimmy. The driver seat rolled forward enough to mount the kicker hideaway powered subwoofer with ease, i slit the carpet just a little (about 3 inches) to run the main harness under the rug to the battery, remote wire and ground location. The sound quality and DB range for a subwoofer this size was amazing and I very much enjoyed the install.

