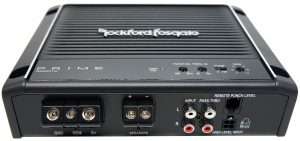
The Rockford Fosgate Prime R500x1D is one of the “hard hitters” of the 3 Rockford Fosgate amplifier series. It offers 500 watts Rms at 2 ohms about 250 at 4 ohms.
As I’ve mentioned in other reviews, I install at least 1 fosgate amplifier a week because they are without a doubt the most affordable performance car amplifiers on the market.


Amazon affiliate here: If you click any Amazon links on my pages and purchase any products I get a small commission from within the original price. Thank you!
The packaging says that that it puts out 500 watts at 2 ohms but after testing the actual out put on the rockford fosgate r500x1d with an oscilloscope I’ve come to realize its real output is much greater, you actually get around 600-650 depending upon your alternator and your batteries health.
Rockford Fosgate offers a full line of efficiency ranges that they measure in “classes”, the rockford fosgate r500x1d runs at 90% efficiency and is rated as a class D amplifier.
A class D amplifier is one of the most efficient amplifiers you can buy and I will always recommend them for sub woofers due to the low amounts of heat they create.
This amplifier was made to match the Rockford Fosgate 12 inch P3 subwoofer, take a look at that official foraudiogeeks.com review!
In other Rockford Fosgate reviews I’ve also mentioned the issue that some of them have with over heating, this even goes for the class D amplifiers.
Find Your Audio System's Ideal Wire Gauge
I haven’t had this issue lately with any of the Prime, Punch or Power series amplifiers from That I’ve received into my shop lately.
I rate amplifiers based on price, efficiency and quality of sound output and I’m giving the Rockford Fosgate R500X1D A 5 out of 5 stars.
The reason Im giving it such a high rating is because of the sound quality that this amp and produces.
As an installer most of the radios I install are in the 70-150$ range and usually lack in sound quality especially from the RCA pre-outs, but when you have an amplifier that produces sound effectively and does the most possible with the sound it is given that creates a happy client.
Helpful Guides and Resources
- How to install an amplifier
- Amplifier troubleshooting tips and tricks
- How to bypass a factory amplifier
- How to install subwoofers
- A review of our favorite Rockford subwoofer
- What wiring Do I need with my subwoofer
Reckford Fosgate R500X1D Review – Specs
- 300 Watts RMS x1 at 4ohms
- 500 watts RMS x1 at 2ohms
- RCA input and output
- EQ with 45hz boost
- Short circuit protection
- High level input
- 4 Gauge/awg input
- Over current protection
- adjustable phase

Rockford Fosgate R500X1D Review – Installation
As with all amplifiers it important to understand what you’ll need for this install as well as how to preform the install. The first thing you’ll need to accomplish this install is an amplifier wiring kit, this will allow you to install this amplifier and make the correct connections.
Fosgate actually makes a wiring kit specifically for The R500X1D and it supplies you with around 17 feet of power wire, RCA connectors, a remote turn on wire that allows the vehicle to turn on the amplifier, a fuse with fuse housing and terminal connectors.
This amplifier can take 8 gauge/awg all the way up to 4 gauge/awg, If you intend on running a (2 ohm) 500 watt RMS system I would recommend running 4 gauge wire for it but if you intend on running it at (4 ohms) 250 watts id recommend 8 gauge/awg.


Rockford Fosgate Punch Series Amplifier Hi Level Wiring Harness
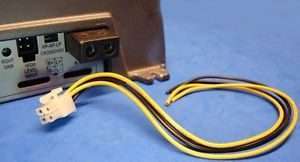
The Fosgate R500 comes with its own built in Hi Lo converter! This is something we see with some Alpine brand amplifiers, and it was very useful for them as-well. What does this mean for customers purchasing this amplifier?
Well, in a nutshell… it saves you from having to buy a separate Hi Lo converter and wire it in somewhere in the car. You cant beat saving money and you definitely cant beat High quality.
Most stand alone hi Lo converters fail to deliver good quality sound. This is because they aren’t built to do so, in order to get high quality sound from a Hi-Lo youll need to but a more expensive Converter.
They are usually powered, this means they require a power, ground and turn on circuit. That’s where amps like this win, nobody wants to by an expensive Hi Lo converter if they can get one built in to their amplifier.
If you have a vehicle what still has the factory radio installed then its almost a no-brainer. This one actually works very well, its powered and I haven’t been able to hear any distortion from it. Which is more than I can say about any separate stand alone converter to date.


rockford fosgate r500x1d Tuning
Tuning the Fosgate r500x1d Prime amp is similar to most other amps. In short, you will start by connecting all of the necessary power and signal wires as we’ve explained in detail in our Amplifier installation guide. Your next step is to mount this amp in an easy to get to place where are flows freely to keep the amplifier cool.
After you’ve made all of your necessary wire connections your ready to start tuning. The adjustments for tuning are located on top of the amplifier above the input and output terminals. I took the time out to make a step by step tuning guide specifically for this amp.
- Turn the “punch EQ” knob down to the “Min” position.
- Turn the “Freq Hz” knob down to 50Hz
- Make sure your “phase” switch is set to 0 unless you hooked up your signal wires in reverse. (If your subwoofer shoots in when the bass hits as apposed to shooting out you might want to turn the phase switch to 180).
- Make sure the “Gain” knob is turned all the way to the left down as far as you can go.
- Insert a CD or USB mp3 drive into your stereo and play your favorite song. (preferably one with good quality and a full range of sound)
- Set your EQ to your standard listening setting.
- If you have an aftermarket stereo check to see if it provides a subwoofer crossover. If it does, set this to full subwoofer EQ range. Don’t EQ your amplifier or add any subwoofer bass boost from your aftermarket head unit if your amplifier ready has those options. If you do, you could possibly over power your amp or your subs and cause fatal issues with your system.
- If you are installing this amp on to a system that uses the factory stereo then make sure to also keep your eq settings to a “standard listening” level. (A standard listening level means to keep your EQ at the level that sounds best for you).
- Turn your music up about 3/4ths of the way up. (Ex. If your volume max is 40 turn if it to 30).
- Now that the music is playing at a higher than normal listening level you can begin to tune your system.
- Your amplifier should be on and fully powered up. Double check that the light is on. If it is not then youll need to do some troubleshooting.
- Assuming your amp is working use the wired remote bass knob that comes with the Rockford Fosgate R500X1D to turn the bass up about half way.
- If this setting is too loud or aggressive turn the knob down a bit to a volume you prefer.
- Now go to your “Freq Hz” knob at the top of your amp and begin to slowly turn it to the right. You’ll start to here the subwoofer become more punchy. Stop as soon as you’ve reached a sound you like. (If you start to here vocals and instruments from your music coming from your subwoofer turn the knob back towards the left until they disappear.
- Now slowly turn the “Punch EQ” to the right listening for a clear punch increase without distortion. Make sure your subwoofer is not distorting. When you find the proper Punch, stop.
Foraudiogeeks.com Note: If you would like to learn how to install the rockford fosgate r500x1d yourself check out our Do-It-Yourself Guide!
Another thing to note while installing the Rockford Fosgate R500X1D is the fact that the gain knobs and switches face up, so you don’t need to worry about accessibility.
That helps out a bunch! The reason the switches are on top of the amplifier is because after the amplifier is installed and powered on begins the tuning process, this is the process of making sure your existing system levels and the Rockford Fosgate R500X1D match up and more importantly making sure you don’t damage your amp or your subwoofer(s).
Which brings me to my final installation tip, It is very important that before you power on your system with your new amp installed that you have both the “gain” and “bass boost” turned down to “0”. I cant tell you how many clients I get that have blown out their systems before they even get to actually get to enjoy it.


